This Photoshop tutorial will acquaint you with the shape tools, dealing with paths, applying layer styles and dealing with shadows and lighting. This is good tutorial for practicing these techniques.
Find A Reference Image
Apple’s website has high resolution photos of the iPod Shuffle to reference when creating you own Photoshop layered document. Using a reference image will help make sure the measurements & proportions are correct.
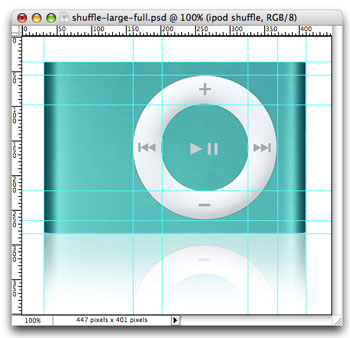
Mark Image With Guides
The next step is to put in guides outlining the Shuffle. First, make sure the rulers are showing in the top & left of the Photoshop document window. If not, go to the menu View >> Rulers. By clicking & dragging the top ruler in the document, a horizontal guide will appear where you let go. A vertical line can be made just the same by dragging from left ruler. Creating guides on the edges of the player and guides that are tangent to click wheel.
Create the base of the unit using a Round Rectangle
Take the rounded rectangle tool (make sure ‘Shape Layers’ is select in the option panel) and drag out a 5 pixel rounded rectangle. If you’ve set snapping to guides, it should be fairly easy to create the rectangle to the same proportions. You now need to adjust some of the anchor points on the path because the object isn’t a perfect rectangle. You can move the anchor points using the Direct Selection Tool Pointer (directly above the Pen Tool and other shape tools). You may also want to change the curvature by dragging the handle points that radiate from an anchor point.
A close up of one corner shows the two points lining up to the grid. The points have been moved slightly moved to conform to the shape of the Shuffle.
Apply Gradient
To add depth and realism, we’ll use a gradient to imitate the effect of light on the object. Because the Shuffle is round on the sides, the shadow will likely be around there. Where there is a shadow, there is usually a highlight, which occurs where the flat part of the object meets the rounded part. To apply a gradient to the rounded rectangle creating in the previous step, go to the menu Layer >> Layer Style >> Overlay. Because the shadow occurs uniformly on either side, it will pay to reflect the gradient on either side. This way you don’t have to repeat the gradient twice. You’ll want to play with the gradient to get the realistic look. You’ll need to play around with your settings until you feel you have something that is realistic. I provided a screen grab of what I came up with.

Create The Button Surface
For the click wheel, we will require the ellipse tool. First make a circle shape that encompasses the entire click wheel. Now in the options palette, choose “Exclude overlapping shape areas” (Figure 1). If you’ve used Illustrator, the options to set how shapes will interact with each other is found in the Pathfinder palette.
![]()
Figure 1. The shapes tools options set to exclude overlaping shapes.
Now create the inner circle to make the ring that is the click wheel. Make sure the fill of this layer is white.
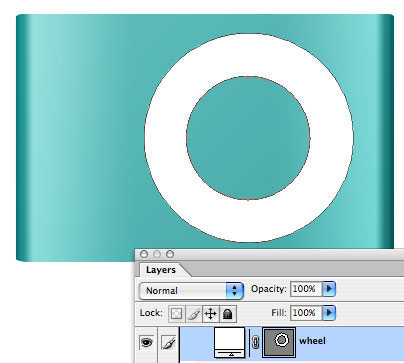
Apply A Layer Style To The Click Wheel
The next step again involves applying a layer style to a shape. This time though a bevel & emboss and a stroke will be applied. The stroke is a simple 1 px gray line around the shape. The Bevel & Emboss is more or less something that you need to play around with to get the right look. I’ve provided my settings for each.
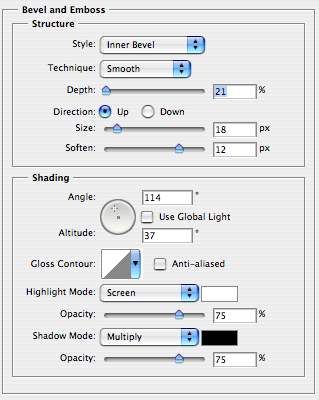
The Stroke and Bevel & Emboss settings for the click wheel.
Button Symbols
The play/pause, forward, back, volume up & volume down buttons are simple rectangles and triangles. Use the rectangle tool, and the polygon tool set to 3 sides (set this in the options palette) to create these shapes.
Create A Realistic Metal Surface
One small touch you can add is a grain to the metal. Without the grain the look of metal looks a tad too much like plastic. You’ll want to start out by duplicating the shape layer of the entire iPod Shuffle and set the color to black. From the menu, select Filter >> Noise >> Add Noise. You’ll have to rasterize the layer. Set the filter to around 100% with Gaussian and Monochromatic.

Take the opacity down to around 1% – 2% opacity and set the blending mode to multiply. You’ll then want to add a mask to this layer. With the gradient tool, you’ll want to drag a gradient from the top left to bottom right of the iPod Shuffle so that the mask allows to layer to show through the top left of the iPod. Generally, you’ll want the noise layer to show through where the object shines, and mask out where there is shadow. Small touches like this can do a lot for imitating the look of a metallic surface.
The Final Result
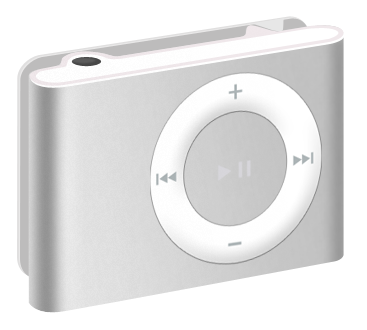
This is Shuffle uses the same concepts covered in this tutorial.