With the recent release of Mac OS X Leopard, I’ve decided to create a tutorial where you can create your own ‘X’. This tutorial is a great exercise in using the dodge and burn tool as well as working with selections.
Set the stage. Take a dark photo will very little color so you can see the X in  proper lighting. If the X were against a white background, it would be hard to see the highlights of the edges in the later stages of this tutorial. This desatuared Cosmos Wallpaper will do the job to achieve this.

Type out the ‘X’
Take the text tool and type out the capital letter ‘X’. I’ve found that the “Myriad Pro Bold” font creates a close resemblance to the real X used in Apple’s artwork. Make the size of the X around 800 pt. (Remember, its always better to start large, then scale down when you are finished.) Set the color to the default black.
Gradient Overlay Layer Style

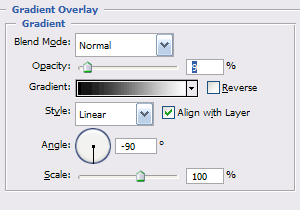
Next, apply a layer style effect to the ‘X’. To access the layer style palette, with the X layer selected, go to the menu under Layer >> Layer Style >> Gradient Overlay. Set the opacity to 9% and the angle to -90 degrees.
Bevel Edge
Right click the ‘T’ corresponding to the text layer and choose “Select Layer Transparency”. Create a new layer above the X and fill in the selection with the color #4c4c4c. After that, go to Select >> Modify >> Contract… Contracting the selection will reduce the size of the selection similar to how a image transform would. Depending on how large you’re, you’ll want to change the contraction size, but the particular size I made the ‘X’, I’ll choose 3 pixels. Now with that new layer still select, hit delete so that the new layer trims around the ‘X’.

A small subtle trim will give the effect of depth.
Dodge & Burn Tools
Its time to take out the dodge and burn tools. These tools are very good for a situation like this because they won’t add any new pixels and the tools won’t harm layers other than the one that is selection. With both of these tools, make sure you use a brush hardness of 0%. This will stop any harsh lines created. It takes a while to get the setting right for the situation, but I’ve found the dodge tool works great at a Range of Shadows and Exposure at 21% (changes these in the options palette). For the burn tool, a Range of Shadows and Exposure set to 6% (yes that 6%, these tools need little exposure have an effect on the image). Add highlights and shadows to the trim layer just like you were painting on it.

The dodge and burn tools should add perspective and proper lighting to the ‘X’.
Use the Selection Tool As A Mask
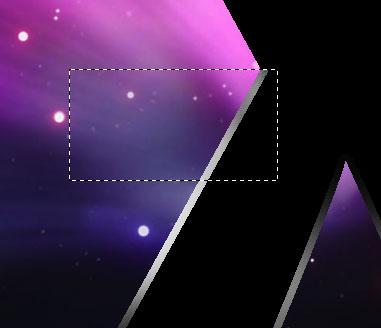
A great way to create an edge is to take the square marquee selection tool, and create along the crease of the ‘X’. Take the dodge tool and brush inside the selection, then go to Select >> Inverse and burn the other side.

Using the rectangle marquee tool is a great way to create edges at joints in the ‘X’ when using the dodge and burn tools.
Gloss
Last but not least is the large gloss reflection that will come across the X. Create a new layer and select the pen tool. With the paths option chosen from options palette, create a swoosh across the ‘X’ and close the pen path outside & around the ‘X’. Take the Path Selection Tool (the point just above the pen tool) and right click on the path and pick “Fill Path…”. Fill the path with white. Again using the “Select Layer Transparency” from the X text layer, create the selection and go to Select >> Inverse and delete the white outside the X.
Change the opacity of the gloss layer to around 40%. Create a layer mask for the gloss layer. Take a white to black gradient set to radial, and drag a gradient from the left side of the X where the reflection appears on the X to about 200 pixels past where the reflection leaves on other side of the X. With a large black brush set to 0% hardness (we don’t want any edges) brush along top left of ‘X’ to fade out some reflection.